 Who says you have to wait until spring to start growing your favorite plants? With a few packs of seeds, some soil, and common kitchen items, you can start seeds in your home during the winter, so you’re ready to plant seedlings outside once spring does roll around. Before taking your seedlings outside, keep in mind that some plants can withstand frost while others cannot. The date of the last frost in your area will help you determine when it’s time to start planting. In the meantime, try out these methods to get your garden started now.
Paper Towels/Coffee Filters
Known as the baggie method, this technique works well with paper towels or coffee filters. You will also need seeds and zip-top bags. Wet a paper towel or coffee filter and gently wring it out so that it’s damp but not dripping. Spread seeds over the bottom half of the towel or filter, then fold the top half over the seeds. Slide it into a bag.
Use a straw to fill the bag with air before you close it to help speed up germination. Place the bag in a warm area of your kitchen, like in front of a window. A radicle should emerge in just a few days. Once it reaches one to two inches long, transport it into seedless soil, such as a mix made of equal parts peat moss, perlite, and vermiculite. Soon after they sprout, transplant the seedlings to seedling pots.
Muffin Tin
Disposable aluminum muffin pans are great for starting your seeds, as they are inexpensive and contain cups that are an ideal size for planting. Start by punching a small hole into the bottom of each muffin cup for proper drainage. Next, put a paper cupcake liner into each cup to prevent the soil from falling through the holes. Finally, plant your seeds in the tin as you would any type of container. Once you’re ready to transplant, simply place the plant, still in its paper liner, into the ground.
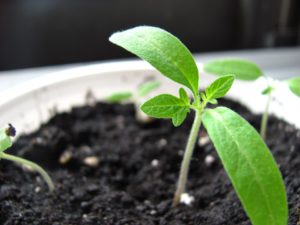
Takeout Containers
Takeout containers are durable and make effective planting trays for seeds. Aluminum and plastic clamshell-type containers can be especially useful for this purpose. To use takeout containers for your seeds, poke holes in the bottoms of them, fill the containers with seeds and soil, and put a cover over them with holes punched in it for ventilation. In two to three weeks, remove the cover to give the seedlings more air.
Ice Cube Trays
Transform an old ice cube tray into a seed starter for your garden. Start by drilling small holes into the bottom of each of the cubes for drainage. Once the tray is ready, simply fill it with soil and seeds. As most ice cube trays are made from resilient plastic, they can be used year after year to start your seeds.
Eggshells
The next time you crack an egg, don’t throw away the shells. While many gardeners crush their egg shells to use in compost, the shells can also be used as natural seedling pots. Punch a small hole in the bottoms of the shells for drainage, and place each shell half into an egg carton. Use the egg shells like containers by filling them with seeds and soil.
Paper Towel/Toilet Paper Rolls
Paper towel and toilet paper rolls can come in handy when you need free seedling pots. One of the easiest ways to do this is by fitting the tubes tightly together in a tray. If you are using paper towel rolls, you will need to cut them in half or into thirds. Once in place, just fill up the tubes with soil and seeds. When you’re ready to transplant the plants, move the seedlings, rolls and all, into the garden.